Wednesday, January 31, 2007

oiling


The saddle is oiled with 100% neatsfoot oil and only 100% neatsfoot oil. I will use some saddle butter on the back of the fenders so sweat does not bleed though. Oiling the saddle can takes a couple days to finish. One heavy coat is applied, the oil is heated to help penetrate the leather. Then another coat or two to even the color out. Once the oiling is done the final assemble is done. Not to far away and this saddle will be done.

cantle bind


Next the top seat is glued to ground seat, once the glued into place the cantle bind area is trimmed and shaped. Then the bind is fit, glued in place and hand sewn. Now that the bind is sewn the double cut border is carved into the swell.

This is the last job of the saddle construction, next is oiling and assembling the saddle.

inlaid seat


The inlaid seat plug is cut out, then the high density foam insert is fit to match the plug, the foam is then covered with oiltan chap leather and it is glued to the seat, then sewn and trimmed.

Saturday, January 27, 2007

small parts


Now is the time to finish all the small parts for the saddle,

: flank cinch and gobetween, billets, latigos, hobble straps, rope strap and buckle, string buttons, martingale dees, latigo and cinch Carry's, swell protector, bucking rolls, and tread the stirrups.

lining skirts


To finish the skirts the blocking leather leather is installed and they are lined with 100%Genuine Bark Tanned Shearling. The saddle strings and lace skirt hangers are installed. Then the skirts are sewn by machine. Once the sewing is done the skirts are trimmed flush, the shearling is trimmed for a nice clean look and edged round. Then the edges are slicked or rubbed with a canvas rag. The process of slicking edges can be done with many different ways. But the best way to get a nice smooth burnished edge that will stay smooth or slicked is elbow grease, if your slicking an edge and the canvas rag doesn't get hot you are not working hard enough.


A little side note on saddle strings, I drill string holes through the tree, I do not just screw the strings to the saddle with a wood screw like all factory saddles are done, even many current custom makers do this also. If the strings are only screwed to the tree and the saddle is cowboyed out of, somewheres down the road the strings will rip out. Drilling through the tree does not affect the integrity of the saddle tree if done properly, this method has been is use for over a 100 years, that is because it works.

Friday, January 26, 2007

horn


The horn is covered after the swell cover has been put on the saddle because a horn cover can take a lot of abuse. Roping, horses flipping over backwards, jumping in a trailer while the horse is saddled( a great way to break a tree) are all very hard on a horn cap, So the horn cover may need to be replaced years down the road, this will make that an easier repair.

The horn cover is fit and stamped then hand stitched.

fenders and leathers


The fenders and stirrup leathers are made to length for this customer. The stirrup leathers are prestretched to minimize stretch once the saddle is made. The heavier of the two stirrup leathers is used on the near side, since that stirrup leather will be stressed more by getting on and off the saddle. Next the fenders are cut and stamped, they are assembled using blevins buckles, holes are punched in the leathers. Then the fenders and leathers are put on this stetching and shaping devise. It will stretch the leathers and fenders minimize stretch and it also will train the fenders so the stirrups will always hang in the proper position.

fitting seat


6;the seat is spiked in place and the drawdown stand is used to get the seat as tight as possible on the saddle. The spikes are removed and the seat temporarily screwed into place and left to dry. once the seat is dry the inlaid padded seat will be fit and then the seat will be glued into place and the cantle will be sewn.


5;Then the drawdown stand is used again to fit the top seat to the ground seat,


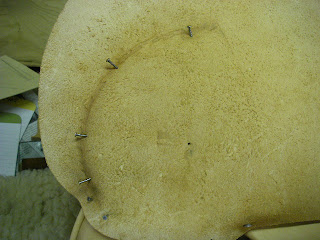
4;The double line border is cut in, if the seat was stamped this is when that would be done. When stamping the seat you must take the shape out of the seat so it can be laid flat on the stamping bench, once you have finished stamping the seat, it must be shaped again to fit the contours of the saddle, as you can see in the photo below the seat is not shaped to fit the ground seat yet. The next couple photos above will show a brief look at the process of shaping the seat with the drawdown stand.


3;the seat is spiked on and the rest of the seat is fit. This is not done by using a set pattern, each seat must be fit to each individual saddle.


2;the ears are fit


1;the ruff seat leather


Howdy;

here are some of the steps to fitting a seat.

Monday, January 22, 2007

chink chaps


howdy;


A little break on this saddle build to fill a chink order that was long over due.

Sunday, January 21, 2007

skirts and jockeys


The skirts are fit to this particular saddle tree using my lines (or my patterns), the skirts are stitched grooved and carved, then blocked on the tree, blocking the skirts is a process of wetting the skirts and then blocking or pounding the skirt around the shape of the bars, then nailing them in place, the nails are not left on the saddle, they are left there only untill the skirts have completely dryed.

Then the back jockeys are fit and installed. They are spiked in place and left to dry.

swell cover


The swell cover is fit and installed on the saddle

cantle filler


The cantle filler is next. The filler is cut to pattern for this cantle height and width. the leather is ruffed or scratched on the grain side to glue better to the rawhide, the the bottom edge is skived to paper thin. then the filler is then glued in place and shaved with the same process as the rest of the ground work.

ground seat


the next steps on the saddle are installing the riggins, the rigs are measures 8 ways from sunday to ensure that they are each dead on accurate both up and down as well as rigging position.

Then the ground seat is installed. I did not get photos of the ground seat process simply because a lot of the ground seat techniques I use have been shown to me by other saddle makers, so the process is not mine to give out to the public. In a couple of the photos you can see the tools used to shave the ground seat as well as a profile gauge which will aid in keeping the seat even from one side to the other. The gauge is just a little help in the shaving process, most of the ground work is done by feel. Making the ground seat takes many hours or even days of work, the ground seat must have no high or low spots, it must be even from one side to the other as well as maintaining the proper seat shape to keep the rider in balance and giving him a good seat to sit in all day. Basically to make his bum smile.

Once the ground seat is finished with the proper rise and shape for the customer the seat is finished to a glass smooth surface, then we are ready to install the cantle filler.


Now that the riggins are dry, they are riveted and sewn. Notice in the second photo how the edges are tapered and notice on the top riggin how the stitches are not only recessed in the stitch groove but they are also pounded over to help protect against wear from the stirrup leathers(the bottom rig was pounded after the photo was taken)
then I edge the riggins and slick the edges, you can see in the photo the tools used to edge and slick.


Friday, January 12, 2007

riggins


howdy;
the riggins are the next thing to work on. they are cut out to pattern according to the riggin position. then they are stitch grooved and skived. Next they are glued together and hung to dry. Once dry I will rivet the rigs and then sew them. The reason I wait for them to dry is so the tracks left by the sewing machine are left to a minimum. I want the saddle to look as clean as possible when I am done, it is up to the customer to make it look used not me.


Thursday, January 11, 2007

cantle back


A couple photos of the cantle back, the brand is carved in the leather then dyed, there is also a double cut border on this saddle.


gullet


Howdy; here are a couple photos of the gullet going in, notice how smooth the blend is on the edges, the leather is shaved to a paper thin edge so not sore the horse, the bottom edges of the gullet do not go past the rawhide stitch line.
This is the tree I will be building this saddle on. It was made by Rod Nikkel, Rods builds some of the best trees made. These are true custom handmade trees. This tree is a wade, with a 4 1/2" cantle, 15 1/2" seat, with a 3" X 3 1/2" horn cap with a pitch of 27*. The bars have a 4" handhole with a 90* spread.


first post

Howdy; this blog will show you some the steps of making a saddle. I will not be showing every single step in the saddle making process for a number of reasons. One reason is simply a matter of time, I can not afford to spend all the time it would take to take all the needed photos and write all the text. I am not trying to write a book here, just show some of my customers what goes into making their saddle. I also will not show some of the techniques I use because those methods were shown to me by others and are not mine to give out to the world.

If you would like to have a look at my online photo album click on this link
http://ca.pg.photos.yahoo.com/ph/flynsaddle/my_photos